Nuance User Manual
Introduction
Nuance is a compact yet powerful sampler, designed to make working with samples fast, intuitive and enjoyable. Its streamlined interface keeps everyday tasks simple, whether you are playing a single sample, building a drum kit or exploring new sounds.
Behind that simplicity is the flexibility to build complex, expressive instruments. Map samples across key and velocity ranges, use velocity crossfades for smooth transitions between layers, and combine multiple groups to shape each part of your sound. Envelopes, LFOs and the modulation matrix bring movement and dynamic articulation to your patches.
This manual will guide you through the interface and the tools available in Nuance, from loading your first samples to mapping instruments, shaping playback and assigning modulation. Read through each section in order, or use the index and search to find the topic you need.
User Interface
The Browser
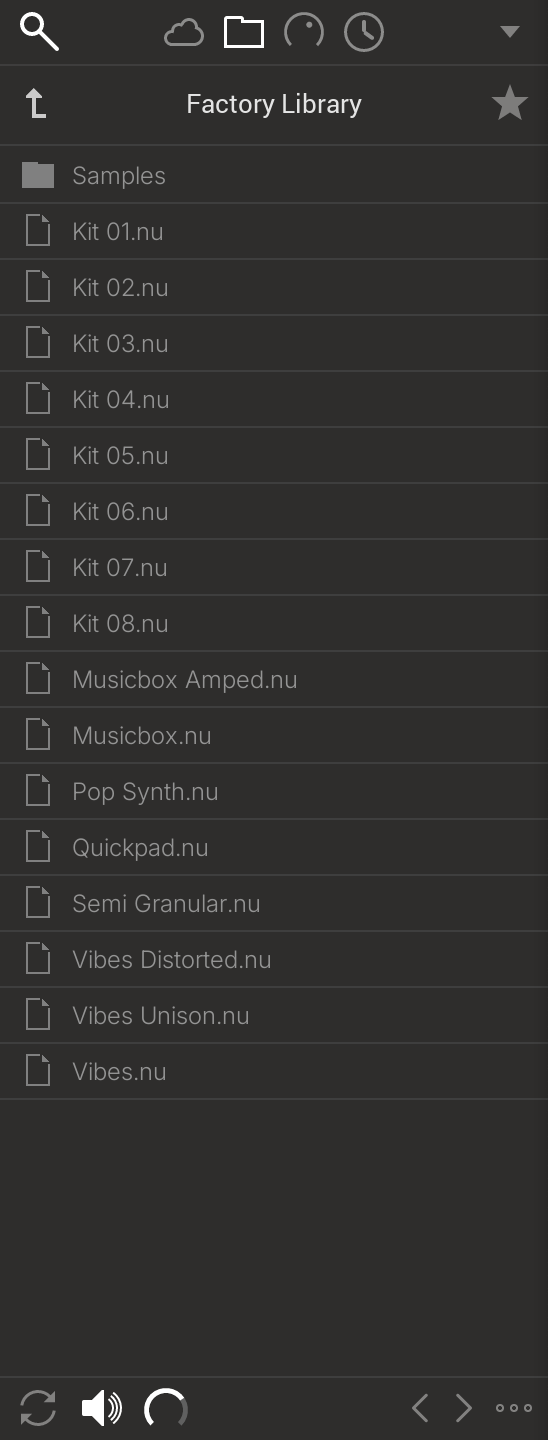
- The Browser is located at the left-hand side of the user interface, and provides quick and easy access to your presets and samples
- The browser also provides access to the Assignment Manager, for an overview of all automatable controls and MIDI learn functionality
- At the top right of the browser is the Main Menu, which includes access to the Setup Dialog
The Header

- The button at the top left reveals the Group Manager, which includes the Drum Pad View
- The Preset Menu displays the currently loaded preset - click here to browse through the Factory Library and other folders
- Undo and Redo buttons are located to the right of the Preset Menu
- All actions, including loading presets are undo-able, so don't be afraid to experiment!
- A Voice Activity display shows the current number of active voices. Click Panic ! to stop all playing voices
- In-app hints can be toggled on or off by clicking the Info button at the far right
- When hints are enabled, hover the mouse over UI elements to reveal a short description
The Waveform
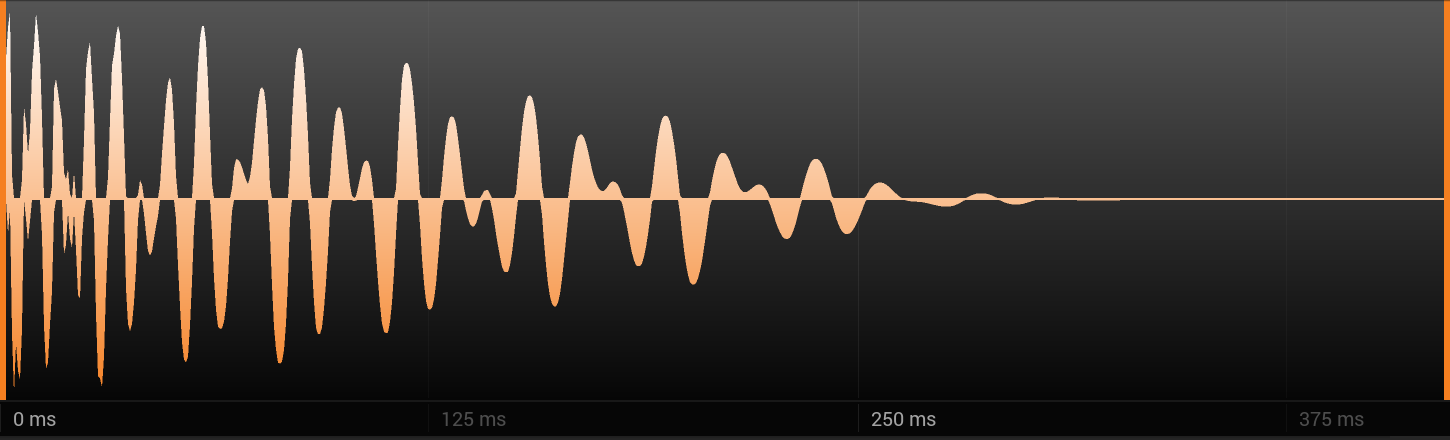
- The large waveform display shows the currently selected sample, with adjustable start and end markers
- Samples can be loaded here by drag and drop, from the integrated File Browser or from Windows Explorer / macOS Finder
- To zoom and scroll the view, hover the mouse over the waveform and click and drag on the orange bar which appears at the bottom
Edit View
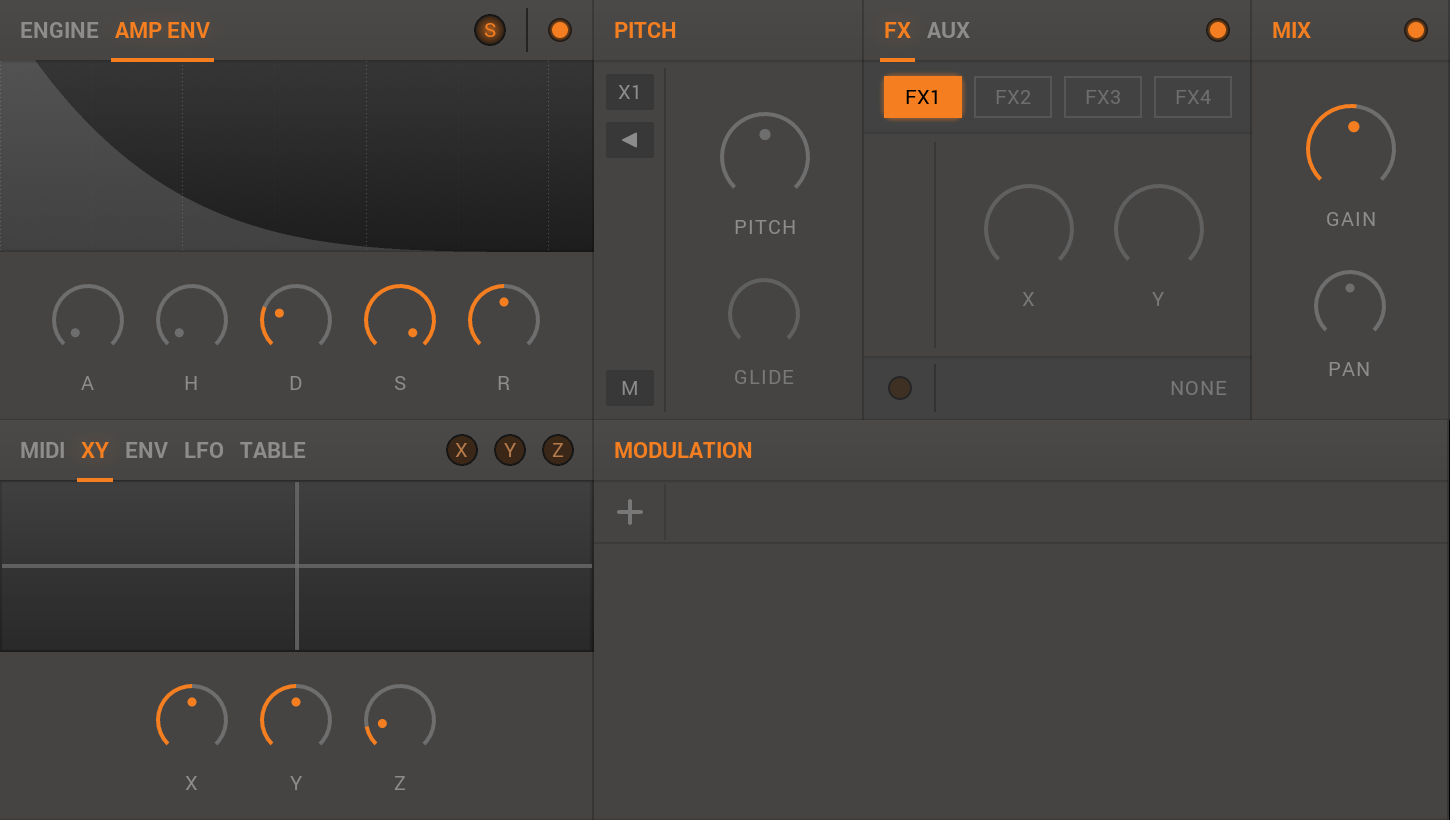
- The Parameter Area is where most of the editing takes place, and provides access to the most relevant "musical" parameters
- The upper row consists of the main playback engine parameters
- The Amplitude Envelope, Pitch, FX and Output controls
- The lower row consists of Modulation controls
- The Modulation Envelopes, LFO's and Modulation Matrix
- See the Groups & Parameters section for more information
Mapping View
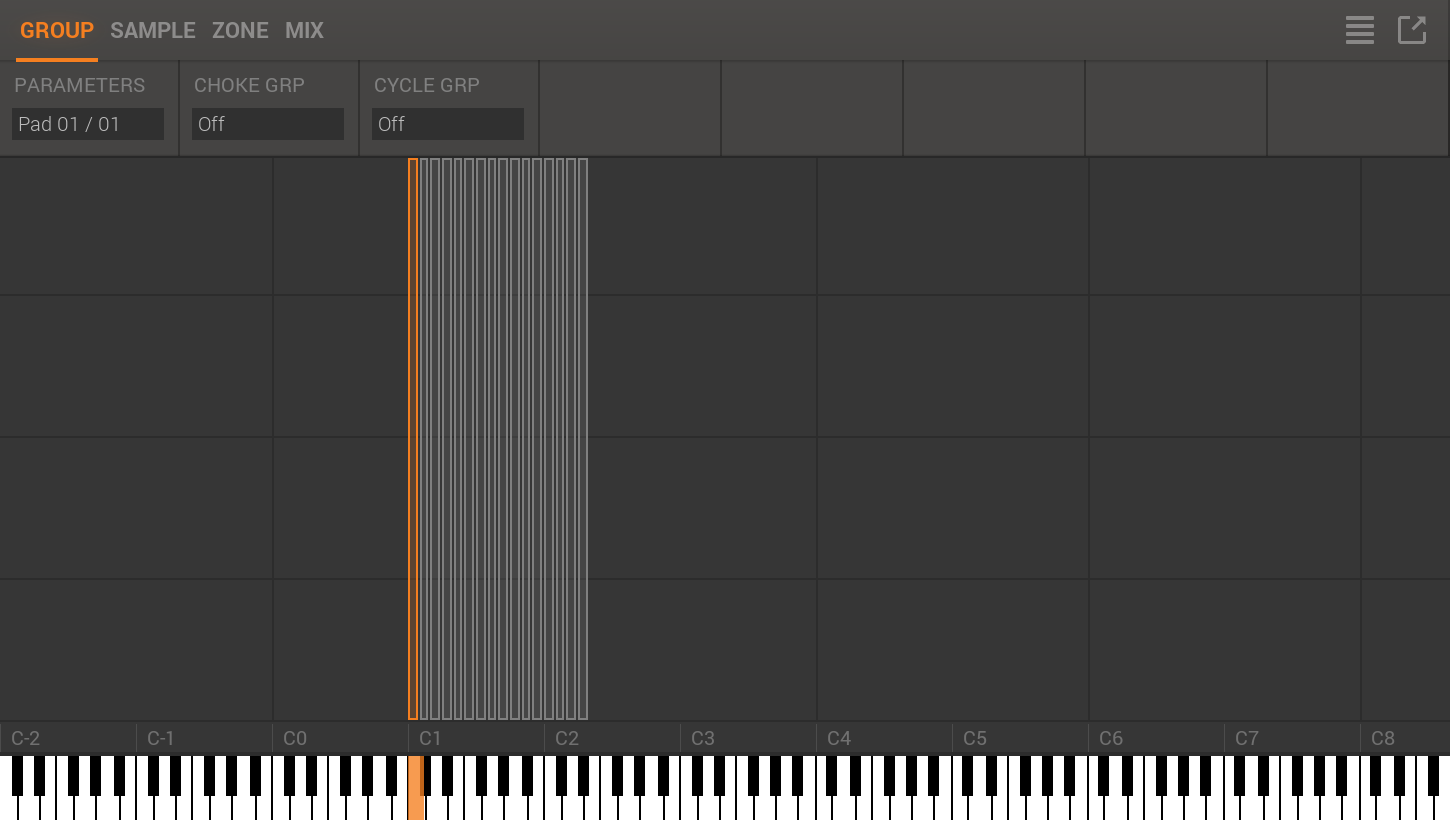
- The Mapping View enables the creation and editing of multi-sample patches, including assigning samples to different key and velocity ranges
- It is accessed by the Mapping tab
- See the Zones & Properties section for more information
Shared Controls and Shortcuts
Press F1 to toggle hints, F8 to show or hide the browser, and F9 to open or close Setup. Use Ctrl/Cmd+Z for Undo; use Ctrl+Y on Windows or Cmd+Shift+Z on macOS for Redo. The instrument must have keyboard focus.
Shift-drag fine-adjusts most continuous controls. Many controls offer reset, MIDI Learn and automation assignment through their context menu; see The Assignment Manager.
Features marked for upgrade depend on the activated edition or licence. Screenshots illustrate the layout; some controls and labels may differ in the current version.
Current Editing Views
The Edit view has Engine and Amp Env tabs, Pitch, FX/Aux and Mix sections, followed by modulators and the matrix. The header includes global pitch, master volume and the polyphony/Panic display. Mapping can be undocked into its own window.
See Playback Engines, Pads and Layers, and Zones and Properties for the expanded workflows.
Groups and Parameters
- A Group is essentially a container for a collection of samples, with a set of common parameters
- Nuance offers an unlimited number of Groups
- Each Group has a number of real-time parameters (such as Pitch, Mix and FX settings) as well as modulation settings, which are common to all samples assigned to that Group
- All controls shown in the Edit View (pictured above) are Group-level settings
- In contrast, the Mapping View is concerned with Zone settings, see the Zones & Properties section for more information
Group Manager / Pad View

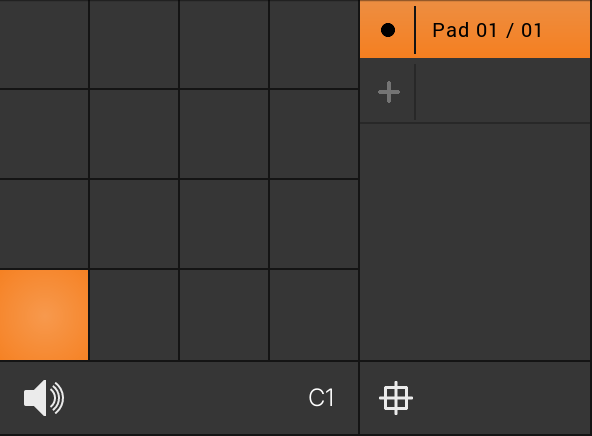
- When working with multiple Groups, open the Group Manager by clicking the button at the top left of the header
- Use this view to select a particular Group to edit, or to create and delete Groups
- This area includes the Pad View, which is useful when constructing drum kits
- The Pad View can be hidden by clicking the 4 x 4 grid icon at the bottom-left
- When the Pad View is on, only Groups associated with the current selected pad are shown (right-hand image above), which is useful for creating layered drum sounds
- When the Pad View is off, all Groups are shown in the list (left-hand image)
Parameters by Section
Amp Envelope
- Enable the Amplitude Envelope by clicking the lamp at the top-right of the Amp Envelope section
- When off, the sample plays in One-Shot mode, meaning it plays for the entire duration of the sample
- MIDI Note-Off events are ignored in One-Shot mode
- The Sustain ("S") button toggles Sustain mode on and off
- When Sustain is off, the envelope operates in AHD mode
- This means amplitude begins to fall to zero immediately after the hold phase (according to the Decay time), and MIDI Note-Off events are ignored
- Hover the mouse over the envelope display to reveal the Velocity Sensitivity control
- At hard-left, MIDI Velocity has no effect on amplitude (i.e. the envelope always reaches max level)
- At hard right, MIDI Velocity fully determines the amplitude peak level
Pitch
- The Pitch section provides controls for the main tuning of the Group, plus Unison and Mono voicing options
- The main Pitch knob adjusts the pitch in semitones (use shift + drag for fine tune)
- The pulldown at the top-left sets the number of Unison Voices
- The Unison setting determines the number of voices which will be created each time a MIDI note is pressed
- By default this is one, but you can select up to 8 voices
- To make use of these additional voices, you need to use the Unison modulation source, see the Modulation Matrix section below for more details
- Additionally, the Rev button enables reverse playback
FX
- The FX section offers 4 x serial FX Slots, with a range of algorithms available per-slot
- To select a slot, click one the FX1 to FX4 tabs
- Choose an algorithm for the selected slot via the menu at the bottom
- You can freely reorder slots by clicking and dragging horizontally
Modulators
- The XY Pad, Mod Envelopes, LFOs and Tables modulation sources are all per Group
- See the Modulation section for more detail
Common Functionality
- Most controls can be fine adjusted by shift-drag
- Most controls can be reset to default by right-click
- Most controls have in-app hints
Choke, Cycle & Audio Output

Outputs
- Nuance has 8 x Stereo Outputs
- Each Group must be assigned to one output channel
- Choose an output channel for the current Group with the "Output" pulldown at the bottom right
Choke Groups
- Each Group can be assigned to a Choke Group
- When two Groups are assigned to the same Choke Group, triggering a new voice in either Group will "choke" all playing voices in the other Group
- Choke Groups are typically used for drums, to prevent selected parts of the drum kit from overlaying
- For example, try assigning the closed hihat and open hihat to the same choke Group
Cycle Groups
- Each Group can be assigned to a Cycle Group
- Groups which are assigned to the same Cycle group will never play at the same time, instead they will trigger alternately
- Cycle Groups are typically used to emulate natural dynamism
- Typically one would use several subtly different samples of the same source material, assigned to the same key range, and assign those Groups to the same Cycle Group
- This can add realism to instrument patches, or prevent 'machine gun' sounding drum kits
- This technique is commonly referred to as 'Round Robin'
Playback Engines, Pads and Routing
The Edit view includes an Engine tab beside Amp Env. See Playback Engines for Sampler, VTime and Granular operation. See Pads and Layers for layered kits, pad menus, Bounce and Export.
The M button enables monophonic legato operation; Glide sets glide time between overlapping notes. The header's global pitch and master volume affect every Group. Click the voice-count display to set maximum polyphony; use Panic to stop voices.
The Mix section sets Group gain and pan. The FX area also has an Aux tab with two sends. See FX, Aux Sends and Outputs for the complete routing workflow.
In the Cycle menu, enable Random to randomise cycling when supported by the activated edition. To make round-robin layers, map their samples to the same key range and assign the participating Groups to the same Cycle Group.
Playback Engines
Each Group chooses its own playback engine. In the Edit view, open the Engine tab beside Amp Env and use the arrows above and below the engine name. Engine changes apply to the selected Groups. The available controls change with the engine.
Sampler
Sampler is conventional sample playback: transposing a note changes both pitch and playback duration. Use the waveform and Mapping view to set sample start/end and loop points.
VTime
VTime separates sample traversal speed from pitch, allowing time stretching while playing the sample at different pitches.
| Speed | Adjust playback speed. 100% corresponds to the source duration. |
| Quality | Choose Draft, Standard or High. Higher quality can require more processing. |
| Extreme | Extend the Speed range for more extreme stretching. |
| SC | Spectral Coherence. This typically improves clarity on pitched material; compare the result with it on and off. |
Granular
Granular builds each voice from overlapping grains. Use it to stretch samples and create textures with independent control of traversal and grain character.
| Speed | Set the rate of traversal through the sample. |
| Size | Set grain duration. |
| Width | Set the stereo spread of grains. |
| Jitter | Randomise grain start positions. Higher values add more variation. |
| KT | Key Track scales grain size with note pitch. |
Working with Engine Settings
Engine controls belong to the Group. Set the engine before adjusting its controls, then use the Group's envelope, FX and modulation to shape the sound. Reverse playback is available with Sampler and Granular; the Reverse control is disabled for VTime.
The Engine panel requires an edition/licence that includes the newer playback engines; an upgrade overlay identifies unavailable features.
Pads and Layers
Use the pad button in the header to enable the drum map. The 4 x 4 Pad View selects a drum sound; its layer list shows the Groups associated with the selected pad. Set Pad Root to choose the kit's starting MIDI note.
Loading and Layering
- Drag a sample onto a pad to load a sound. Select a pad and use its layer list to work with the Groups making up that sound.
- Each layer is a Group, with its own engine, envelope, FX, modulation, gain and pan. Select the layer before editing these controls.
- Use the audition option to hear pads when selecting them. Track follows the last played Group.
Pad Context Menu
| Choke / Cycle | Assign the pad's layers to choke or round-robin groups. |
| Output | Route the pad's layers to a stereo output pair. |
| Copy / Paste | Copy a pad's layers and paste them onto another pad. Settings and sample references are carried with the layers. |
| Reset | Reset the sound settings of the pad's layers. |
| Clear | Remove the pad's layers. |
Bounce and Export
- Bounce renders the pad's sound to a WAV file and replaces its layers with one layer playing the rendered sample. Use Undo if you want to return to the layered version.
- Export renders the pad to a WAV file at a location you choose, keeping its layers available for editing.
- Bounce and Export require the edition/licence that includes these features. A pad with no layers has no sound to render.
Group Editing
The Group/layer list provides rename, enable and solo controls, plus context-menu commands for Reset Settings, Copy Settings, Paste Settings, Copy, Paste, Duplicate and Remove. Copy Settings reuses parameters; copying a whole Group also carries its zones.
For pitched multisamples, use Mapping. For output and send routing, see FX, Aux Sends and Outputs.
Modulation
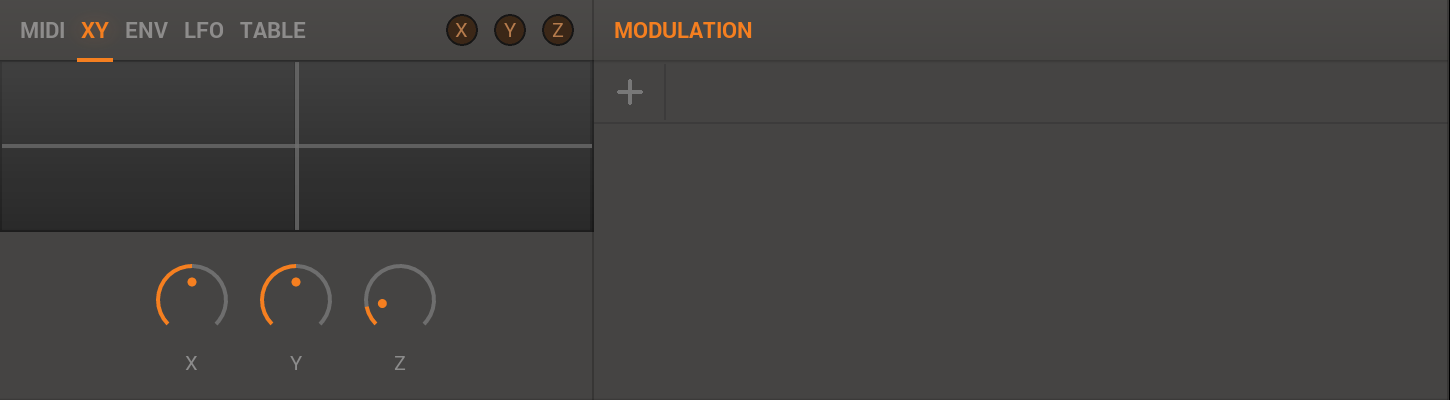
- Nuance features a powerful Modulation system, featuring both internal and external Sources, which can be assigned to various Destinations
- Sources are assigned to Destinations via Slots in the Modulation Matrix
- Each Slot connects one Source to one Destination, by a specified Amount
Internal Sources
XY Pad
- The XY Pad also provides a convenient way to modulate two parameters simultaneously via mouse movements
- The XY Pad also can be used in conjunction with the Assignment Manager to modulate destinations via host automation
- Assign Automation ID's to the X, Y and Z parameters, and then assign the X, Y and Z sources to target destinations via the Modulation Matrix
- For example, to automate Loop Length in your host, assign an Automation ID to the X parameter, and then assign X to Loop Length
- X, Y and Z can be drag-and-drop assigned to parameters by dragging the corresponding icons in the top right of the XY Pad section
Modulation Envelopes
- Three Modulation Envelopes are available per Group
- Each Envelope will output a value from 0.0, up to a max-peak of 1.0 (depending on Velocity sensitivity), and then fall back down to 0.0 again
- See the in-app hints for details on each parameter
LFO's
- Three LFO's are available per Group
- Each oscillates between a value of -1.0 to +1.0
- The LFOs have variable shape and can optionally operate tempo-synced
- See the in-app hints for details on each parameter
Tables
- Three step-sequenced Table sources are available per Group
- Each Table has up to 16 steps, and each value (ranging from 0.0 to 1.0) can be edited by the mouse, or the entire Table can be randomised (via context menu)
- See the in-app hints for details on each parameter
Unison
- To use the Unison source, first ensure that the Unison option (in the Pitch section) is set to x2 or higher
- When selected as a source in the Matrix, each Unison voice is assigned a constant value, spread equally from -1.0 to +1.0 across the Unison voices, for example...
- ...with x2 Unison Voices, the first voice has a value of -1.0, while the second voice has a value of +1.0
- ...with x3 Unison Voices, the first voice has a value of -1.0, the second 0.0, and the third +1.0
- ...with x4 Unison Voices, the values are -1.0, -0.33, +0.33, +1.0
- etc
- To achieve the classic unison de-tuning effect, select x2 or more voices, and then assign Unison to Pitch
Random
- 2 x Random sources are available as sources in the Matrix
- When enabled, a Random value (from -1.0 to +1.0) will be created for each voice at note-on
External Sources
| Pitchbend | MIDI PitchBend | Bi-Polar |
| CC1 | MIDI Modulation Wheel | Uni-Polar |
| Aftertouch | MIDI Channel Aftertouch | Uni-Polar |
| Velocity | MIDI Note On Velocity | Uni-Polar |
| Note | The MIDI note number is scaled from -1.0 at note 0 to +1.0 at note 127. Its value is (2 x note / 127) - 1, with the midpoint between notes 63 and 64. | Bi-Polar |
Creating and Editing Routes
- Select the Group or pad layer you want to edit.
- Select a source in the MIDI, XY, Env, Lfo or Table section. Drag its source icon to a compatible control or into the Modulation Matrix.
- Select the destination and adjust the route amount. Positive and negative amounts give opposite modulation directions.
A route belongs to the Group. Zone properties such as key and velocity ranges determine which samples respond, while Group modulation shapes the resulting voices. Destinations depend on the selected engine and FX algorithms.
LFO and Table Timing
- LFO Sync enables musical timing; in Lock mode phase follows song position. With Sync off, Speed controls free-running frequency. Shape morphs through triangle, sine and square, and Phase sets the starting phase.
- For Tables, Step sets the musical duration of each step and Length sets the number of steps. Retrig resets the play position when a voice is triggered. Use the table context menu to randomise its values.
Modulation Destinations
In addition to Pitch, Amp, Pan, Start and Loop, the destination menus expose active FX controls and supported envelope/LFO parameters. Start is applied when a voice begins; continuous destinations can change while it plays. Set up the FX first, then choose the destination names shown for that configuration.
Zones and Mapping
A Zone maps one sample to a key range and velocity range. Each Zone belongs to a Group; the Group supplies its engine, envelope, FX and modulation. Several Zones can share a Group, and a patch can contain multiple Groups.
Mapping View
- Open Mapping and drag samples from the File Browser into the map. Select multiple browser samples with Ctrl/Cmd-click or Shift-click when needed.
- Select Zones in the map and move or resize their key/velocity ranges. Select multiple Zones to edit their properties together.
- The property editor has four tabs: Group, Sample, Zone and Mix. A view button switches between graphical mapping and the list view. The undock control opens Mapping in a separate window.
- The map context menu includes Select All, Select by Group, Select None and Group Lock to filter the map by Group.
Group Tab
| Parameters | Choose the Group supplying the selected Zones' sound parameters, or choose New Group. |
| Choke Grp | Assign the Zones' choke behaviour. |
| Cycle Grp | Assign the Zones to a cycle/round-robin group. |
Sample Tab
| Root Key | The MIDI note that plays the sample at its original pitch. Notes above it transpose upwards; notes below it transpose downwards. |
| Start / End | The sample playback boundaries, in samples. |
| Fade Out | Fade the end of the playback range to reduce clicks. |
| Loop Mode | Off, Until Release, or Until End. Until Release leaves the loop when the MIDI note is released; Until End allows looping during the envelope's release. Enable the amplitude envelope and Sustain for a sustained, note-controlled sound. |
| Ping Pong | Alternate forward and reverse loop traversal. |
| Loop Start / End | The boundaries of the loop within the sample. |
| Loop X-Fade | Crossfade the loop boundary to reduce discontinuities. This requires extra processing and is unavailable for Ping Pong loops. |
Zone Tab
| Key Lo / Hi | Lowest and highest MIDI notes that trigger the Zone. |
| Vel Lo / Hi | Lowest and highest note velocities that trigger the Zone. |
| Key Lo / Hi Fade | Fade the Zone near its lower and upper key boundaries. |
| Vel Lo / Hi Fade | Fade the Zone near its lower and upper velocity boundaries, useful for blending overlapping layers. |
Mix Tab
Gain, Pan and Tune adjust each Zone independently of the Group's sound parameters. These controls are useful for balancing a multisample without creating a separate Group for every sample.
Mapping Commands
- Use Split Velocity in the Zone context menu to distribute overlapping Zones across velocity layers.
- Assign to Groups puts selected Zones into separate Groups so their sound parameters can be edited independently.
- Reset Root Key resets root-key assignments. Right-click the map keyboard to set a root key; click the keyboard to audition notes.
- Delete / Backspace removes selected Zones. Ctrl/Cmd+A selects all Zones and Ctrl/Cmd+D clears the selection while Mapping has focus.
- Most numeric properties support double-click text entry as well as dragging.
FX and Audio Routing
FX, send levels and main output routing are stored per Group. Select the intended Group before editing.
The FX section contains four serial slots. Select FX1 to FX4, choose an algorithm from the menu, and adjust its controls. Drag the slot tabs horizontally to change processing order. Enable/bypass each slot independently, or bypass the FX section.
Algorithms
| Shape | Compression/shaping and drive for changing dynamics and adding distortion. |
| LP / BP / HP / Notch | Low-pass, band-pass, high-pass and notch filtering, with cutoff and resonance. |
| LP24 / HP24 | Steeper low-pass and high-pass ladder filters. |
| AM / FM | Amplitude and frequency modulation for additional harmonics and metallic tones. |
| Frequency Shifter | Shift frequency components for inharmonic and animated effects. |
| SampleRate / BitDepth | Reduce sample rate or bit depth for lo-fi effects. |
| Chorus | Modulated doubling controlled by rate and depth. |
| Stereo Width | Adjust the stereo image. |
Controls and additional switches depend on the algorithm. KT, where offered, enables MIDI key tracking. Use hints for the selected algorithm's controls. Some algorithms require a newer edition/licence and show an upgrade prompt when unavailable.
SampleRate also offers a DAC processing option. Chorus offers a W mode switch. Stereo Width provides SWP to swap channels, and -L/-R to invert the polarity of the left/right channel.
Aux Sends
- Select the Aux tab and enable the Aux section.
- Enable Send 1 or Send 2, choose a destination output pair, and set the send level.
- Enable that output in your host and route it to an effect or mixer channel. For example, send to 15+16 and insert a reverb on that pair in the host.
Aux sends provide additional output routes; the reverb or other send effect must be supplied by the host. Each send has its own enable switch, level and output selection.
Main Outputs
There are eight stereo output pairs, labelled 1+2 through 15+16. Choose the main output using the instrument's Output menu. In a plug-in, enable the corresponding outputs in the host before routing them in its mixer. In standalone, available physical channels depend on the selected device and enabled outputs.
Files, Presets and Samples
Use the File Browser for folders and samples, PatchCloud for tagged content, and the Preset Menu for quick access to the current preset folder.
Open, Reset and Save
- The main menu provides Reset, Open (including recent files), Save, and Save with Samples.
- Reset returns the instrument to its initial state. Use Undo to recover an edit or a previous preset.
- A normal save references sample files. When moving a preset to another computer, use Save with Samples > Embed to include its samples in the preset, or Collate to collect the samples alongside it. Keep the collected files together when moving a collated preset.
- Preset sample collection and embedding samples in host projects are separate options. Saving an ordinary preset does not make it self-contained.
The File Browser
- Click the path display to choose a drive, Factory Library, User Presets, or a Favourite folder. Use the star to add the current folder to Favourites; manage the list in Setup > File.
- Load a preset from the browser or drag a sample to the instrument. The Open dialog lists the sample formats supported by the installed version.
- Use the speaker button to audition samples before loading them, and the adjacent volume control to set audition level. Cycle Mode allows quick exchange of the current preset or sample.
- Use Ctrl-click on Windows or Cmd-click on macOS to select separate browser items; Shift-click selects a range.
PatchCloud and SoundPacks
- Open the cloud browser to browse tagged Factory Library and SoundPack content and organise local content. Use its search to narrow the results. Ctrl/Cmd+F opens the content search.
- Use Install SoundPack in the main menu to select a downloaded SoundPack file. Online content and downloads require a connection; the File Browser provides access to local files.
The Preset Menu
- Click the preset name to open the menu. Use the folder submenu to choose Factory Library, User Presets, a Favourite, or Browse for another folder.
- Use the previous/next buttons or Alt+Up / Alt+Down to load the previous/next preset. Plain arrow keys may be used by the active editor.
- Click Save in the header to save the preset. Choose a destination in the file dialog when requested.
Missing Samples
If referenced samples have moved, use the Missing Samples dialog. Its Files and Folders views let you locate an individual file or relocate a missing folder. Use Locate to supply the new location. Save the preset or host project after resolving the references. Discard only entries you intend to remove.
File Shortcuts
| Ctrl/Cmd+O | Open |
| Ctrl/Cmd+S | Save |
| Ctrl/Cmd+Shift+S | Save As |
| Ctrl/Cmd+N | Reset |
| Alt+Up / Alt+Down | Previous / next preset |
Keyboard shortcuts apply while the instrument has keyboard focus; the host may reserve some combinations.
Instrument Import and Export
- Open .nu presets, samples, SFZ, EXS and Nuance XML instrument files. Imported formats are translated into Nuance Groups and Zones; review the mapping and sound after import.
- The file menu provides Export SFZ and Export XML. Availability depends on the activated edition, and export is unavailable in demo mode. SFZ exchange does not represent every Nuance-specific engine, FX or modulation setting; keep a native preset for further editing.
- For an open SFZ or XML instrument, the file menu offers Auto Reload. Enable it to reload the source when editing that file externally. Save a native copy before relying on edits made inside Nuance.
MIDI and Automation
Open the Assignment Manager from the browser's control panel. It lists the real-time parameters available for MIDI control and, in a plug-in, host automation. Select a parameter in the interface to find it in the list.
MIDI Learn
- Connect and enable the controller. In standalone, enable its MIDI port in Setup; in a plug-in, route its MIDI through the host.
- Select the parameter, choose the MIDI view, and click Learn.
- Move the hardware controller while Learn is active. Click Learn again to stop learning when needed.
Supported parameter controls also offer MIDI Learn in their context menu. An assigned control offers an Unassign MIDI CC command.
Host Automation
- In the plug-in, select AUTO in the Assignment Manager.
- Select the parameter and click Assign to allocate an available Automation ID. Alternatively, choose Assign Automation ID in the control's context menu.
- Select that automation parameter in your host and record or draw the automation there.
An assigned control offers an Unassign command in its context menu. The host controls which automation lanes are visible and whether the plug-in receives MIDI CC messages.
Editing and Reusing Assignments
- Double-click an assignment entry to edit its numeric ID. Clear the entry to remove the assignment.
- The Assignment Manager's menu provides Reset for the selected assignment type.
- In the MIDI view, use Open and Save to reuse MIDI assignment templates (.midicc files).
Only real-time parameters appear here. Use the instrument's modulation system for destinations that are exposed through modulation rather than direct host automation.
Setup
Open Setup from the main menu, or press F9. Select a page using the tabs. Audio and MIDI device configuration is available in the standalone application; a plug-in receives audio configuration, MIDI and transport from its host.
Audio (Standalone)
- Select an audio Device, then choose a supported SampleRate and Latency. On Windows the standalone application uses ASIO; on macOS it uses Core Audio.
- Sample rates are expressed in Hz: 44100 Hz is 44.1 kHz, and 88200 Hz is 88.2 kHz. Higher rates increase processing load and do not improve every sound.
- A smaller buffer gives a faster response but requires more processing headroom. Increase latency if you hear crackles or dropouts.
- Enable the required output channels in the Outputs list. The main stereo signal uses the first output pair. If the device offers its own control panel, use Control Panel to open it.
MIDI (Standalone)
Enable the MIDI input ports you want to play or use for MIDI Learn. In a plug-in, route your keyboard/controller to the instrument track in the host. Enabling a port in the standalone application does not configure the plug-in's host routing.
File: Startup and Default Patch
- In the plug-in, Store Current in Default Patch stores the current instrument state as the starting point for new instances. Restore Factory removes this custom default.
- In standalone, the Startup section offers Recall Last Session.
File: Sample Embedding
- Embed Samples in Host Projects includes sample data when the host saves the instrument state, subject to Max Size. An Unlimited choice is available.
- If the required sample data exceeds the limit, keep the referenced files accessible. Choose an appropriate limit before relying on a project to carry its samples.
- For a portable preset outside a host project, use Save with Samples; see Files, Presets and Samples.
File: Favourites
Add or remove Favourite folders in the Locations list. These folders provide shortcuts in the File Browser and Preset Menu.