Vice User Manual
Introduction
- Vice is the powerful yet easy-to-use sampler specifically designed for working with loop files
- Vice can automatically slice loops by transients, assigning each slice to a key on your MIDI keyboard, instantly transforming your loops into playable drum kits
- Vice can also play loops in tempo-sync with your DAW
- Vice also offers a wealth of deeper editing features, including a range of slicing modes, manual adjustment of slices, and a inspiring selection of FX and parameters, all individually tweakable for each slice
User Interface Overview
The Browser
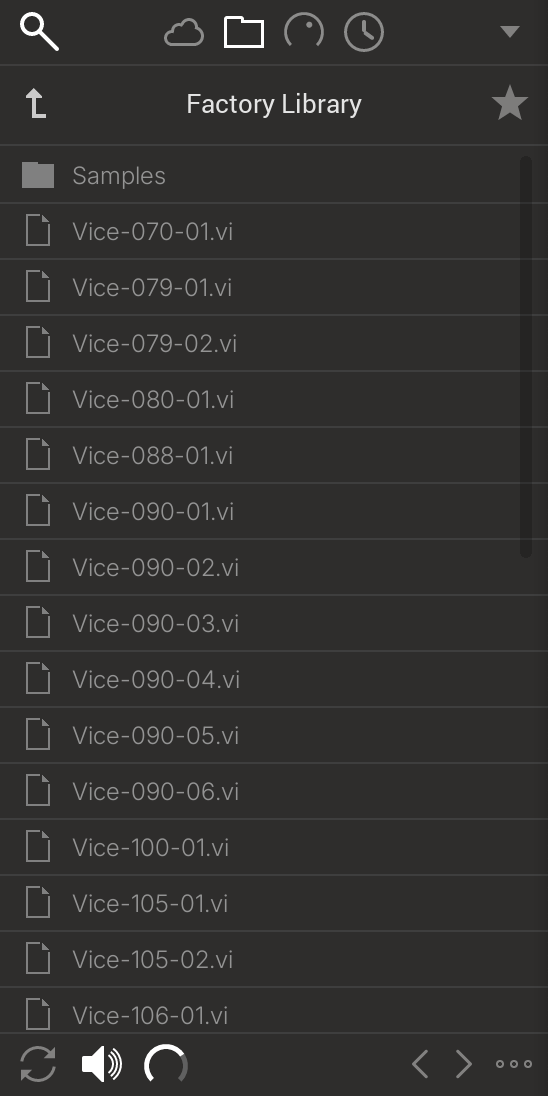
- The Browser is located at the left-hand side of the user interface, and provides quick and easy access to your presets and samples
- The File Browser (folder icon) allows you to navigate your drives and folders
- PatchCloud (cloud icon) provides a tag-based content management view, for both your own local content as well as online expansions (when available)
- The browser also provides access to the Assignment Manager, for a full overview of all controls and MIDI learn functionality
- At the top right of the browser is the Main Menu, which includes access to the Setup Dialog.
The Header

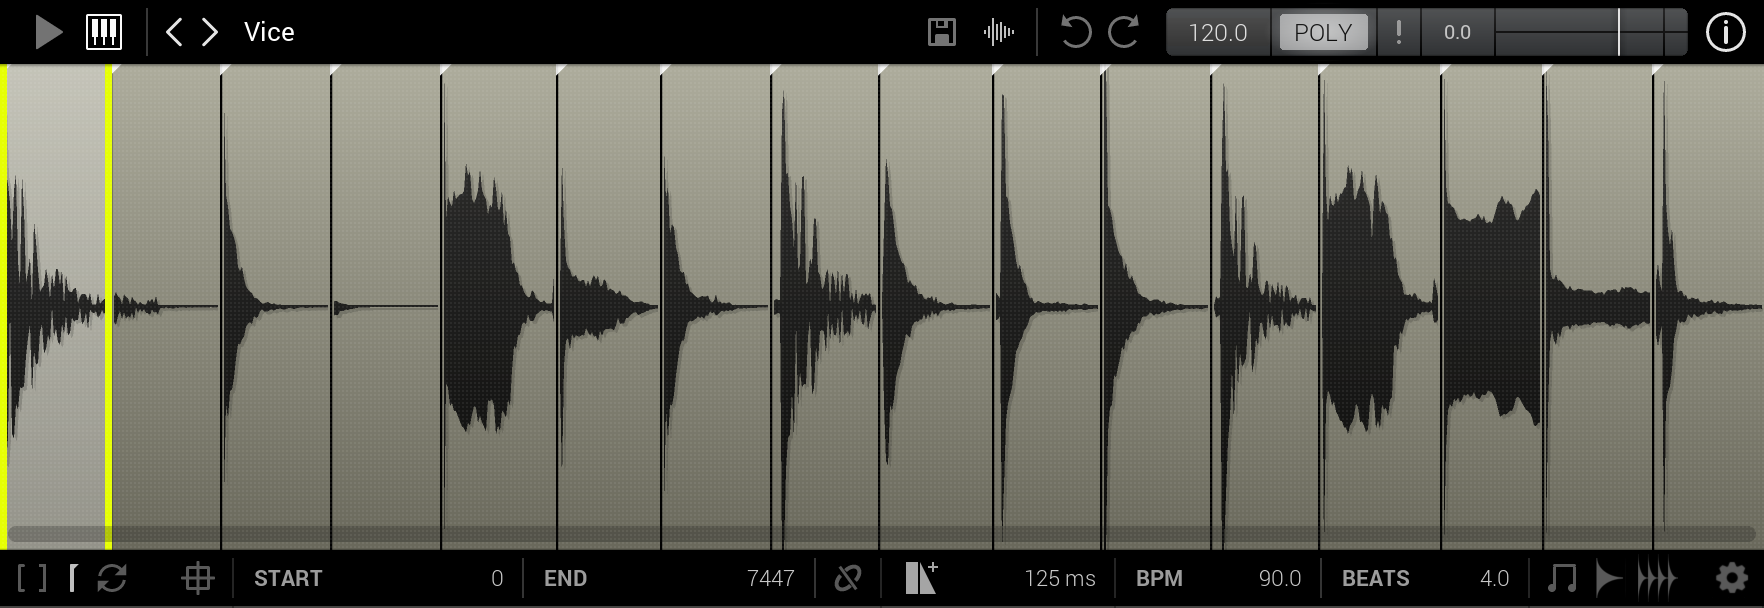
- At the left of the header are 2 icons (Play and MIDI) used to select the main Play Mode (see the Slicing section).
- The header shows the currently loaded preset
- Click on the preset name to open the Preset Menu, from here you can quickly browse through the Factory Library or another folder of your choice
- In app Hints can be toggled on or off by clicking the info icon at the far right of the header
- When Hints are enabled, hover the mouse over UI elements and controls to reveal a short description
The Waveform
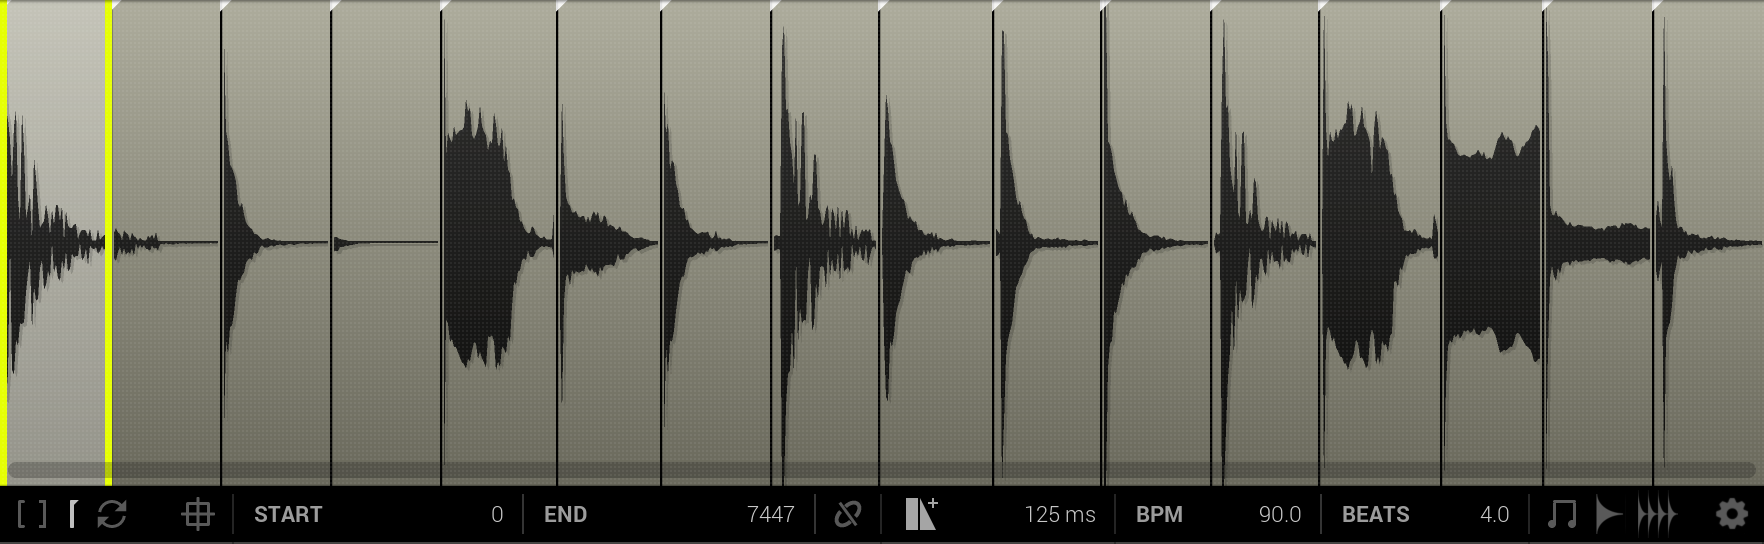
- The large waveform display shows the currently loaded loop, with adjustable markers for each slice.
- Loops can be loaded here by drag and drop, from the integrated File Browser or from Windows Explorer / macOS Finder.
- Click at the top of the waveform to create new slices
- Click and drag at the bottom of the waveform to zoom and scroll
- Beneath the waveform, the Properties Bar contains various modes and options
- The 3 leftmost icons select an editing mode: Trim, Slice and Loop
- Enable the 'target' icon to enable auto-selection (the last played slice will be automatically selected)
- The rightmost icon group contains the Export controls
- See the Slicing Loops section for more information
The Parameter Area
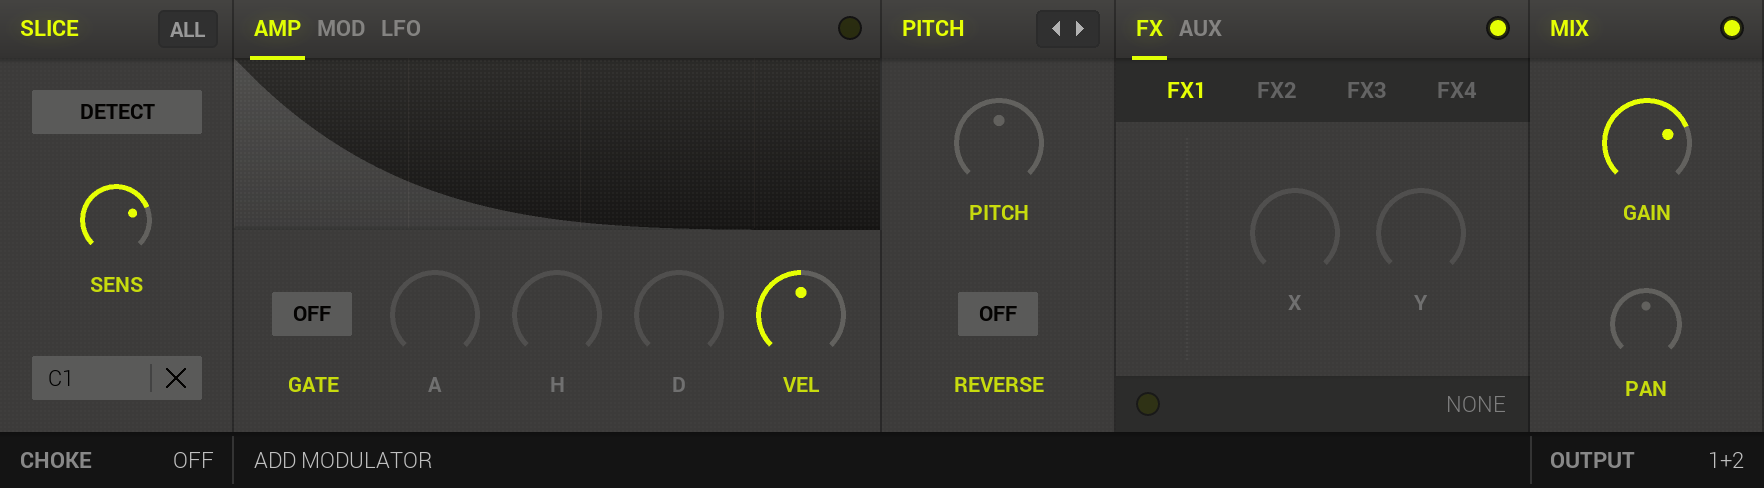
- The Parameter Area is separated into several sections
- The Slice section at the left-hand side contains controls for selecting the slicing algorithm and the root note for the entire loop
- The remaining sections contain a range of sound-related parameters for the selected slice (Envelope, FX, Mix etc)
- At the very bottom of the Parameter Area are controls for assigning modulation sources (such as Velocity, LFO etc) to various modulation targets
- See the Editing Parameters section for more detail
Shared Controls and Shortcuts
Press F1 to toggle hints, F8 to show or hide the browser, and F9 to open or close Setup. Use Ctrl/Cmd+Z for Undo; use Ctrl+Y on Windows or Cmd+Shift+Z on macOS for Redo. The instrument must have keyboard focus.
Shift-drag fine-adjusts most continuous controls. Many controls offer reset, MIDI Learn and automation assignment through their context menu; see The Assignment Manager.
Features marked for upgrade depend on the activated edition or licence. Screenshots illustrate the layout; some controls and labels may differ in the current version.
Files, Presets and Samples
Use the File Browser for folders and samples, PatchCloud for tagged content, and the Preset Menu for quick access to the current preset folder.
Open, Reset and Save
- The main menu provides Reset, Open (including recent files), Save, and Save with Samples.
- Reset returns the instrument to its initial state. Use Undo to recover an edit or a previous preset.
- A normal save references sample files. When moving a preset to another computer, use Save with Samples > Embed to include its samples in the preset, or Collate to collect the samples alongside it. Keep the collected files together when moving a collated preset.
- Preset sample collection and embedding samples in host projects are separate options. Saving an ordinary preset does not make it self-contained.
The File Browser
- Click the path display to choose a drive, Factory Library, User Presets, or a Favourite folder. Use the star to add the current folder to Favourites; manage the list in Setup > File.
- Load a preset from the browser or drag a sample to the instrument. The Open dialog lists the sample formats supported by the installed version.
- Use the speaker button to audition samples before loading them, and the adjacent volume control to set audition level. Cycle Mode allows quick exchange of the current preset or sample.
- Use Ctrl-click on Windows or Cmd-click on macOS to select separate browser items; Shift-click selects a range.
PatchCloud and SoundPacks
- Open the cloud browser to browse tagged Factory Library and SoundPack content and organise local content. Use its search to narrow the results. Ctrl/Cmd+F opens the content search.
- Use Install SoundPack in the main menu to select a downloaded SoundPack file. Online content and downloads require a connection; the File Browser provides access to local files.
The Preset Menu
- Click the preset name to open the menu. Use the folder submenu to choose Factory Library, User Presets, a Favourite, or Browse for another folder.
- Use the previous/next buttons or Alt+Up / Alt+Down to load the previous/next preset. Plain arrow keys may be used by the active editor.
- Click Save in the header to save the preset. Choose a destination in the file dialog when requested.
Missing Samples
If referenced samples have moved, use the Missing Samples dialog. Its Files and Folders views let you locate an individual file or relocate a missing folder. Use Locate to supply the new location. Save the preset or host project after resolving the references. Discard only entries you intend to remove.
File Shortcuts
| Ctrl/Cmd+O | Open |
| Ctrl/Cmd+S | Save |
| Ctrl/Cmd+Shift+S | Save As |
| Ctrl/Cmd+N | Reset |
| Alt+Up / Alt+Down | Previous / next preset |
Keyboard shortcuts apply while the instrument has keyboard focus; the host may reserve some combinations.
Batch Import: REX and RMX
- Choose Batch Import > REX or RMX in the file menu.
- Select Source and Output folders.
- Choose Embed Samples to make the imported presets carry their samples.
- Proceed with the import and wait for its progress page to finish; browse the destination folder to load the resulting presets.
Batch Import requires the edition/licence that includes it. Use a separate destination folder to keep converted presets organised. See Slicing Loops for REX slicing and MIDI, slice and loop export.
Slicing Loops
Selecting the Play Mode
- Vice can operate in either Play or MIDI mode
- These modes are displayed at the left of the header
- In MIDI mode, slices are triggered individually by MIDI notes
- When in MIDI mode, click on the MIDI icon a second time to open a menu to switch between Slice and Phrase sub-modes
- In Slice mode, pressing a MIDI note will play the slice assigned to that note only
- In Phrase mode, Vice will continue to play successive notes while the MIDI key is pressed (note that in the plugin, your DAW transport must be running for this mode to operate)
- In Play mode, Vice will play the loop in tempo-sync with your DAW transport
- In the standalone version, a tempo control is shown on the main header
- For Play mode to correctly sync, the loop must be correctly trimmed and the correct tempo / number of beats must be set (see below)
- When Play mode is selected, drag horizontally at the bottom of any slice to adjust that slice's timing
Selecting a Slice Mode
- When a loop is loaded it is automatically sliced according to the selected algorithm in the Slice section.
- The automatic and manual slicing modes are summarised below; imported REX files also provide a REX mode
Slice Modes
| Detect |
|
| Grid |
|
| Split |
|
| Manual |
|
Manually Adjusting Slices
- To adjust the position of a slice, place the mouse cursor over a slice and drag horizontally
- While dragging, Slices are automatically snapped to nearby zero crossings. Press Shift to disable snap to zero-crossings
- For finer control of the slice position, zoom into the waveform by vertically dragging the zoombar at the bottom of the waveform (or use the mouse wheel)
Creating and Deleting Slices
- New slices can be created by clicking at the top of the waveform
- Additionally slices can be created clicking by Alt-Click
- Slices can be deleted by Right-Click
Loop Trimming
- When working with samples that are not perfect loops, use Trim mode to dial-in the correct loop region
- To trim the loop, simply click and drag the first and last slice markers
- Note that when hovering the mouse over the first or last marker, it will change from yellow to white)
- Alternatively, you can enter trim mode by clicking the Trim icon (the left most icon on the Properties bar beneath the Sample Display)
Setting the BPM and Number of Beats

- When a loop is loaded, Vice automatically detects the BPM and Number of Beats
- These settings are important for both correct Grid slicing and MIDI Export
- The auto-detection works best on loops in 4/4 time-signature which are below 150 BPM
- To manually correct a value, either dragging vertically on the control, or double-click and enter a value via the keyboard
- Right-click on either control to open a menu with additional options, including Double and Half BPM.
Slice Unlink
- By default the end of each slice is determined by the position of the next slice, i.e. slices are 'linked'
- To Unlink a slice, click the Unlink icon in Slice editing mode (the Marker icon)
- When unlinked, the slice will have its own end marker, which can be set independent of the next slice
Slice Looping
- Loop can be enabled for individual slices
- To enable Slice loop, press the Power button in Loop editing mode (the Loop icon)
- By default, the entire slice region will be looped
- Click the Unlink button to specify a sub-range to loop
- You can enable forward-reverse looping via the FLIP button
Tail Mode
- The Tail mode control can be used to enhance the sound loops without silence between individual slices
- When Tail generation is on (the + icon), Vice automatically generates an tail for the selected slice
- The length of the tail is calculated automatically based on the length of the slice, but you can manually adjust the maximum length with the length control
- When Tail generation is off, Vice will automatically apply a short decay envelope to the end of the slice
- In this mode, the length control specifies the maximum decay time
Export Controls
- The export controls are found at the right of the Properties Bar
- There are 3 main export icons: MIDI, Slice and Loop
- To export to a particular folder, click any export button to open a file dialog to select a destination
- Alternatively, click and drag from the icon to export by drag-and-drop
Export Modes
| MIDI |
|
| Slice |
|
| Loop |
|
Keyboard Shortcuts
- Press the Left / Right arrow keys to select the previous or next slice
- Hold Alt while pressing left / right to also trigger the slice
- Press Enter to trigger the selected slice
- Press Up to zoom in to the selected slice (or the trim region in Trim mode)
- Press Down to zoom out to show the whole loop
- Press Ctrl/Cmd + A to select all slices, and Ctrl/Cmd + D to clear the selection
- You can use Ctrl/Cmd + C to copy a slices settings, and Ctrl/Cmd + V to paste those setting to all selected slices
- Use the + and - keys to increment/decrement Pitch for selected slices (hold shift for fine adjustment)
- Press Space to enter Play mode and toggle playback (standalone only)
MIDI Mapping and Phrase Playback
- Click the MIDI button again while MIDI mode is active to open its options. Choose All Keys or White Keys for the automatic slice mapping, and Slice or Phrase playback. Phrase requires the edition/licence that includes it.
- The note display shows the selected slice's MIDI note. Click it to learn a key from your MIDI keyboard; Escape cancels note learning. The adjacent clear control removes a custom note assignment and restores automatic mapping. A custom assignment for the first slice sets the start of the automatic mapping.
- In Slice mode, Poly allows overlapping slices. With Poly off, use one slice at a time. Assign slices to a Choke Group to make related slices cut each other off.
- In Phrase mode, a mapped note selects the corresponding point in the loop and playback continues through successive slices at tempo. This is useful for live rearrangement. The plug-in requires the host transport to run.
- Click Play to enter transport-synchronised loop playback; click it again to pause that mode.
Selection and Slice Properties
Use Ctrl/Cmd-click to toggle slices in a selection and Shift-click to extend a selection. Track selects the last triggered slice; All edits all slices. Review these switches before editing. The slice context menu provides selection, reset, copy/paste settings, link-length, loop and zoom commands.
In Marker mode, unlink length to give a slice its own end marker. In Loop mode, unlink the loop to set an independent sub-range. Loop During Release permits looping after note-off when the amplitude envelope is enabled; Flip alternates forward and reverse looping.
In Detect mode, right-click the Slice controls for EnhanceV2 and ZeroCrossingV2 options, which select the newer detection enhancement and zero-crossing processing.
REX Slices and Audio Export Options
REX mode uses the slice markers imported from a REX file. Use the other slicing modes to create a different segmentation of ordinary audio loops.
The Export Options menu sets the drag-and-drop render folder and can open that folder. Choose SampleRate Auto, 44100, 88200 or 96000 Hz, and BitDepth 16, 24 or 32 for audio rendering. Choose an explicit rate when the destination requires a particular sample rate. MIDI export is a sequence rather than rendered audio.
When dragging an audio export, keep holding the mouse while rendering; drop it when the files-ready notification appears. Entire-loop audio export is unavailable in demo mode. Selected-slice export follows the current selection.
Editing Parameters
- The sound of each slice can be subtly tweaked or totally transformed via Vice's powerful range of sound-sculpting parameters, FX and modulation options
- This section provides an overview of each group of parameters, but note that most controls have in-app Hints, so please refer to those for further details of each parameter
Common Functionality
- Most controls can be fine adjusted by shift-drag
- Most controls can be reset to default by right-click
- For most parameters it is possible to edit all slices simultaneously by enabling the ALL button on the header of the Slice section
Amp Envelope
- An amplitude envelope can be enabled individually for each slice by clicking the power button at the top-right above the envelope display
- By default, the envelope works in One-Shot mode, meaning that it will ignore note-off events
- Enable Gate mode to release the envelope with note-off events
Pitch
- The Pitch section contains the main tuning control for the selected slice
- Additionally, the Rev button enables reverse playback
FX & AUX Sends
- The FX section comprises 4 serial FX Slots, with a choice of FX module per-slot
- To select a slot, click one the FX1 to FX4 tabs
- Choose an algorithm for the selected slot via the menu at the bottom
- You can freely reorder slots by clicking and dragging horizontally
- The Aux section provides 2 AUX sends per-slice
- This is useful to route individual slices to Send-FX in your DAW
- For example, in your DAW insert a Reverb FX after outputs 15+16, then enable Aux 1 in Vice, and select output 15+16 for the destination
Modulation
- Vice features a powerful Modulation system, which allows any modulation Source to be routed to any Destination
- To select a Source, click 'Add Modulator'
- Additionally, Envelopes and LFOS can be quick-assigned by dragging from the numeric indicator at the top-right of the MOD and LFO sections
- Set the Amount of modulation for each Destination by dragging the horizontal sliders
Modulation Sources
| Pitchbend | MIDI PitchBend wheel | Bi-Polar |
| CC1 | MIDI Modulation Wheel | Uni-Polar |
| AfterTouch | MIDI AfterTouch | Uni-Polar |
| Velocity | MIDI Note On Velocity | Uni-Polar |
| Random 1 | A random value created for each voice at note-on | Bi-Polar |
| Random 2 | A second random value created for each voice at note-on | Bi-Polar |
| Mod Env 1 | The first modulation Envelope in the MOD section | Uni-Polar |
| Mod Env 2 | The second modulation Envelope in the MOD section | Uni-Polar |
| LFO 1 | The first LFO, see the LFO section to set the LFO shape and speed | Bi-Polar |
| LFO 2 | The second LFO, see the LFO section to set the LFO shape and speed | Bi-Polar |
Editing Scope and Routing
Sound parameters belong to slices. Select several slices to edit them together, or enable All for the whole loop. Track can change the selected slice as you play.
Mix sets slice gain and pan. Output selects one of eight stereo output pairs. Choke Groups 1 to 8 let related slices cut each other off; choose None to disable choking. See FX, Aux Sends and Outputs for algorithms and host routing.
Envelope and LFO Details
The Amp, Mod and LFO tabs select the amplitude envelope, two modulation envelopes and two LFOs. Amp Attack, Hold and Decay shape the slice; Velocity sets its response to note velocity. Gate makes note-off release the envelope; without Gate it operates as a one-shot.
For an LFO, turn Sync on for tempo timing and use its division control. Lock synchronises phase to song position. With Sync off, Speed sets frequency. Shape morphs between triangle, sine and square, and Phase changes the start phase.
Modulation routes use a source, destination and amount. Available destinations depend on the active FX algorithms. Start modulation applies at voice creation; continuous destinations can change during playback.
FX, Aux Sends and Outputs
FX, send levels and main output routing are stored per slice. Select the intended slice before editing.
The FX section contains four serial slots. Select FX1 to FX4, choose an algorithm from the menu, and adjust its controls. Drag the slot tabs horizontally to change processing order. Enable/bypass each slot independently, or bypass the FX section.
Algorithms
| Shape | Compression/shaping and drive for changing dynamics and adding distortion. |
| LP / BP / HP / Notch | Low-pass, band-pass, high-pass and notch filtering, with cutoff and resonance. |
| LP24 / HP24 | Steeper low-pass and high-pass ladder filters. |
| AM / FM | Amplitude and frequency modulation for additional harmonics and metallic tones. |
| Frequency Shifter | Shift frequency components for inharmonic and animated effects. |
| SampleRate / BitDepth | Reduce sample rate or bit depth for lo-fi effects. |
| Chorus | Modulated doubling controlled by rate and depth. |
| Stereo Width | Adjust the stereo image. |
Controls and additional switches depend on the algorithm. KT, where offered, enables MIDI key tracking. Use hints for the selected algorithm's controls. Some algorithms require a newer edition/licence and show an upgrade prompt when unavailable.
SampleRate also offers a DAC processing option. Chorus offers a W mode switch. Stereo Width provides SWP to swap channels, and -L/-R to invert the polarity of the left/right channel.
Aux Sends
- Select the Aux tab and enable the Aux section.
- Enable Send 1 or Send 2, choose a destination output pair, and set the send level.
- Enable that output in your host and route it to an effect or mixer channel. For example, send to 15+16 and insert a reverb on that pair in the host.
Aux sends provide additional output routes; the reverb or other send effect must be supplied by the host. Each send has its own enable switch, level and output selection.
Main Outputs
There are eight stereo output pairs, labelled 1+2 through 15+16. Choose the main output using the instrument's Output menu. In a plug-in, enable the corresponding outputs in the host before routing them in its mixer. In standalone, available physical channels depend on the selected device and enabled outputs.
The Assignment Manager
Open the Assignment Manager from the browser's control panel. It lists the real-time parameters available for MIDI control and, in a plug-in, host automation. Select a parameter in the interface to find it in the list.
MIDI Learn
- Connect and enable the controller. In standalone, enable its MIDI port in Setup; in a plug-in, route its MIDI through the host.
- Select the parameter, choose the MIDI view, and click Learn.
- Move the hardware controller while Learn is active. Click Learn again to stop learning when needed.
Supported parameter controls also offer MIDI Learn in their context menu. An assigned control offers an Unassign MIDI CC command.
Host Automation
- In the plug-in, select AUTO in the Assignment Manager.
- Select the parameter and click Assign to allocate an available Automation ID. Alternatively, choose Assign Automation ID in the control's context menu.
- Select that automation parameter in your host and record or draw the automation there.
An assigned control offers an Unassign command in its context menu. The host controls which automation lanes are visible and whether the plug-in receives MIDI CC messages.
Editing and Reusing Assignments
- Double-click an assignment entry to edit its numeric ID. Clear the entry to remove the assignment.
- The Assignment Manager's menu provides Reset for the selected assignment type.
- In the MIDI view, use Open and Save to reuse MIDI assignment templates (.midicc files).
Only real-time parameters appear here. Use the instrument's modulation system for destinations that are exposed through modulation rather than direct host automation.
Setup
Open Setup from the main menu, or press F9. Select a page using the tabs. Audio and MIDI device configuration is available in the standalone application; a plug-in receives audio configuration, MIDI and transport from its host.
Audio (Standalone)
- Select an audio Device, then choose a supported SampleRate and Latency. On Windows the standalone application uses ASIO; on macOS it uses Core Audio.
- Sample rates are expressed in Hz: 44100 Hz is 44.1 kHz, and 88200 Hz is 88.2 kHz. Higher rates increase processing load and do not improve every sound.
- A smaller buffer gives a faster response but requires more processing headroom. Increase latency if you hear crackles or dropouts.
- Enable the required output channels in the Outputs list. The main stereo signal uses the first output pair. If the device offers its own control panel, use Control Panel to open it.
MIDI (Standalone)
Enable the MIDI input ports you want to play or use for MIDI Learn. In a plug-in, route your keyboard/controller to the instrument track in the host. Enabling a port in the standalone application does not configure the plug-in's host routing.
File: Startup and Default Patch
- In the plug-in, Store Current in Default Patch stores the current instrument state as the starting point for new instances. Restore Factory removes this custom default.
- In standalone, the Startup section offers Recall Last Session.
File: Sample Embedding
- Embed Samples in Host Projects includes sample data when the host saves the instrument state, subject to Max Size. An Unlimited choice is available.
- If the required sample data exceeds the limit, keep the referenced files accessible. Choose an appropriate limit before relying on a project to carry its samples.
- For a portable preset outside a host project, use Save with Samples; see Files, Presets and Samples.
File: Favourites
Add or remove Favourite folders in the Locations list. These folders provide shortcuts in the File Browser and Preset Menu.